Operating instructions
There are several appliances in your accommodation. Instructions for using these appliances can be found in the guides below:
Hob
Dishwasher
Nespresso coffee machine
Oven and combination microwave
Sauna
Thermostat
Extractor
Infrared cabin
Television
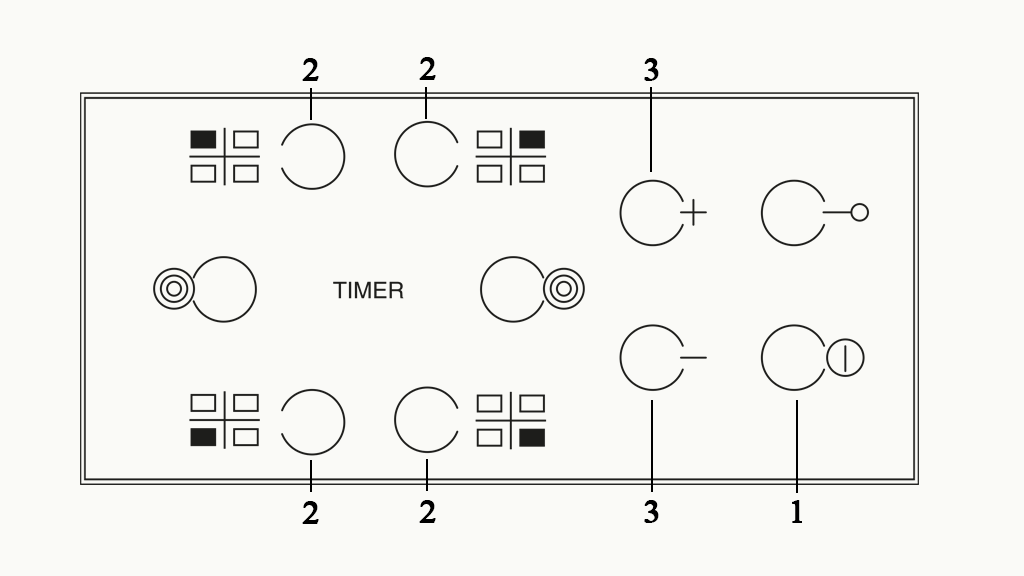
Type A
1. First, check that the child lock has been turned off. If the key icon on the hob is illuminated, the child lock is on. Press and hold the button next to the icon for two seconds to unlock the hob.
2. Press and hold the ON button (button 1) for several seconds.
3. '0' will now flash on the display panel.
4. Select the hotplate you wish to use by pressing one of the buttons 2
5. Press one of the buttons 3 (or use the slider) to select the desired heat setting. The heat settings range from 1 to 9.
6. Turn off the hob by pressing button 1 again. An 'H' will appear on the display. This means that the hotplate is still hot from residual heat.
Useful information:
- For safety reasons, if no action is taken within 10 seconds of the hob being switched on, it will switch off again automatically. If this happens, you can switch the hob on again.
- The control panel will be deactivated 10 seconds after the heat setting is selected. To adjust the heat setting, first press button 2, then change the temperature by pressing one of the buttons 3.
- A warning beep will sound if there is anything on the hob when it is not locked.
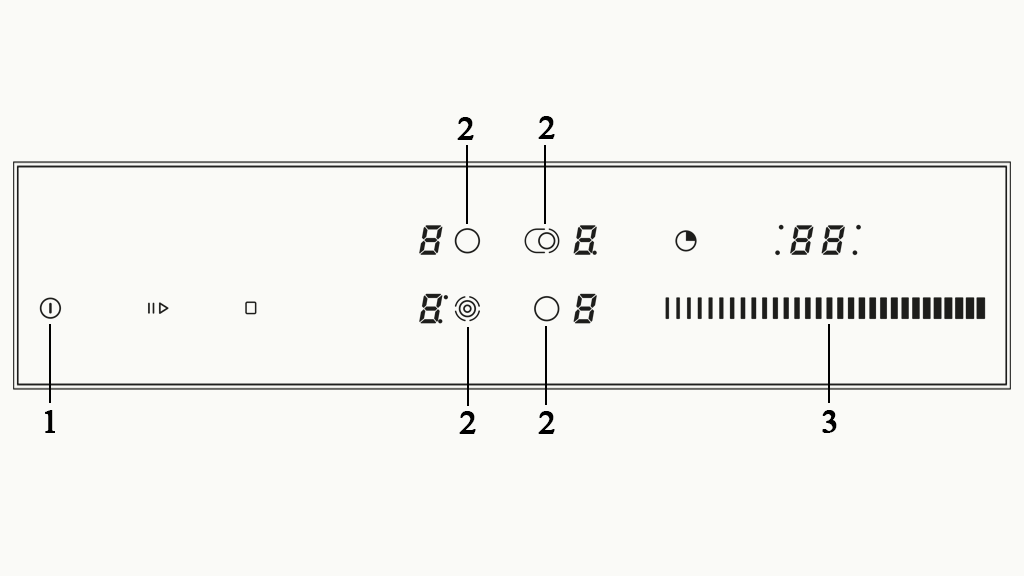
Type B
1. First, check that the child lock has been turned off. If the key icon on the hob is illuminated, the child lock is on. Press and hold the button next to the icon for two seconds to unlock the hob.
2. Press and hold the ON button (button 1) for several seconds.
3. '0' will now flash on the display panel.
4. Select the hotplate you wish to use by pressing one of the buttons 2
5. Press one of the buttons 3 (or use the slider) to select the desired heat setting. The heat settings range from 1 to 9.
6. Turn off the hob by pressing button 1 again. An 'H' will appear on the display. This means that the hotplate is still hot from residual heat.
Useful information:
- For safety reasons, if no action is taken within 10 seconds of the hob being switched on, it will switch off again automatically. If this happens, you can switch the hob on again.
- The control panel will be deactivated 10 seconds after the heat setting is selected. To adjust the heat setting, first press button 2, then change the temperature by pressing one of the buttons 3.
- A warning beep will sound if there is anything on the hob when it is not locked.
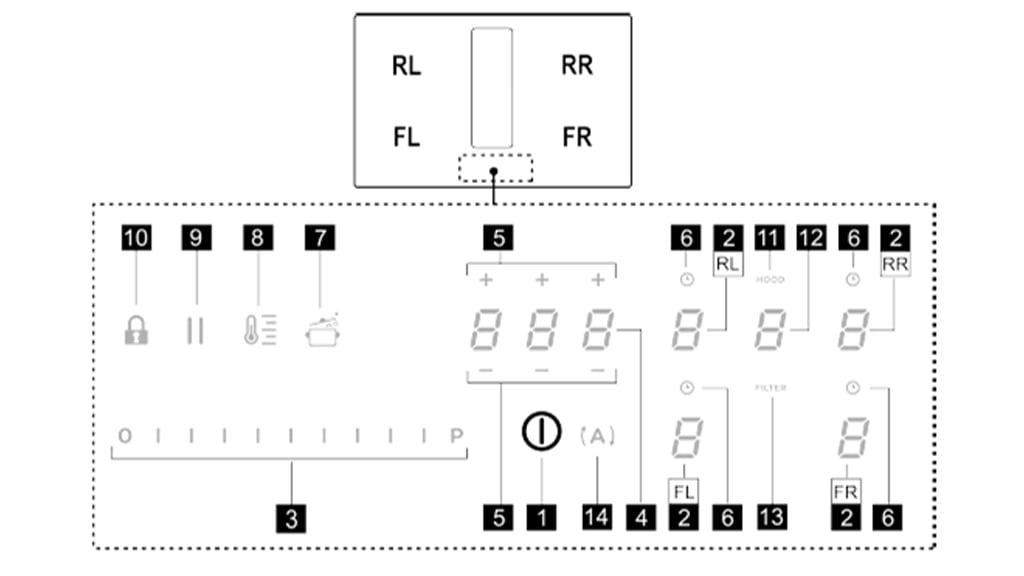
Type C
1. Briefly press the ON/OFF button (key 1). The symbol will light up. Hold the button to access all available functions.
2. Choose the cooking zone you wish to use (one of the keys 2).
3. Press the selection bar (key 3) to set the desired heat level. The heat levels range from 1 to 9.
4. Turn off the cooktop by pressing the ON/OFF button (key 1). An ‘H’ will appear on the display of the used zone, meaning the zone is still hot.
How to use the extractor?
1. Briefly press the ON/OFF button (key 1). The symbol will light up. Hold the button to access all available functions.
2. Then press the extractor selection button (key 12).
3. Press the selection bar (key 3) and slide your finger across it to set the desired power (levels range from 1 to 3).
4. Press the ON/OFF button (key 1) again to turn off the extractor.
Good to know
- Some functions won’t activate, or will turn off automatically, if no pans are placed correctly on the zones.
- Each zone has a maximum operating time, depending on the selected power level.
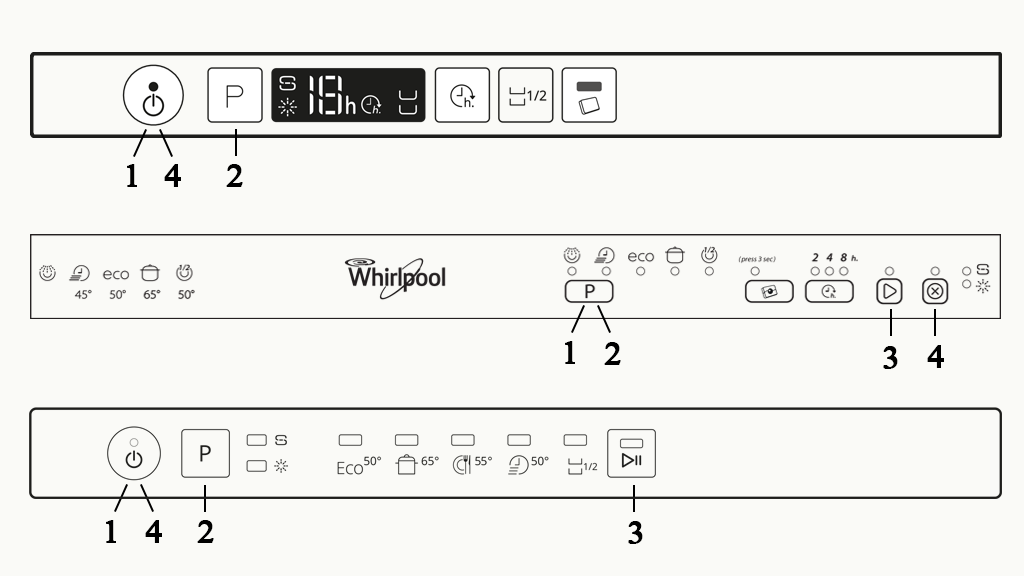
Dishwasher
There are three types of dishwasher in accommodations at Efteling Bosrijk. Identify which one you have in the image below.
1. Open the dishwasher.
2. Place a dishwasher tablet in the left-hand compartment inside the door. If there is no compartment for a dishwasher tablet, place the dishwasher tablet in the cutlery basket.
3. Press button 1 to turn on the dishwasher.
4. Press button 2 to select the desired programme.
5. Press button 3 to start the programme. If your dishwasher has no button 3, you can skip this step.
6. Close the dishwasher. The selected programme will start automatically.
7. Once the programme has finished, press button 4 to turn off the dishwasher.
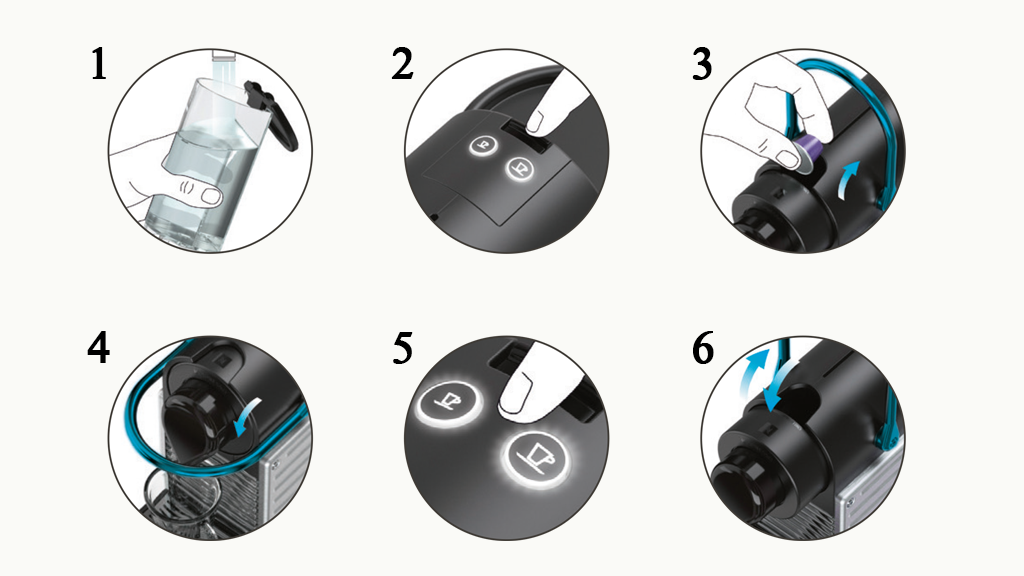
Nespresso coffee machine
1: Rinse out the water tank and then fill it with water. The water tank can be removed by lifting it.
2: Press one of the two buttons (see image ) to turn the appliance on. The buttons will flash, and the appliance will now heat up. This can take up to 25 seconds. When the lights stop flashing, the appliance is ready for use.
3: Push the capsule clamp away from you and insert a Nespresso capsule into the slot.
4: Close the capsule clamp by pulling it towards you. Place a cup under the coffee spout. Never open the capsule clamp when the machine is operational.
5: There are two buttons to select the type of coffee you would like. For espresso, select the small cup. For regular coffee, select the large cup.
6: Remove the cup from under the coffee spout. Push the capsule clamp away from you to open it and close it again so that the capsule falls into the used capsule container.
Oven and combination microwave
There are four types of oven in the accommodations at Efteling Bosrijk. See which of the user guides below applies to your accommodation.
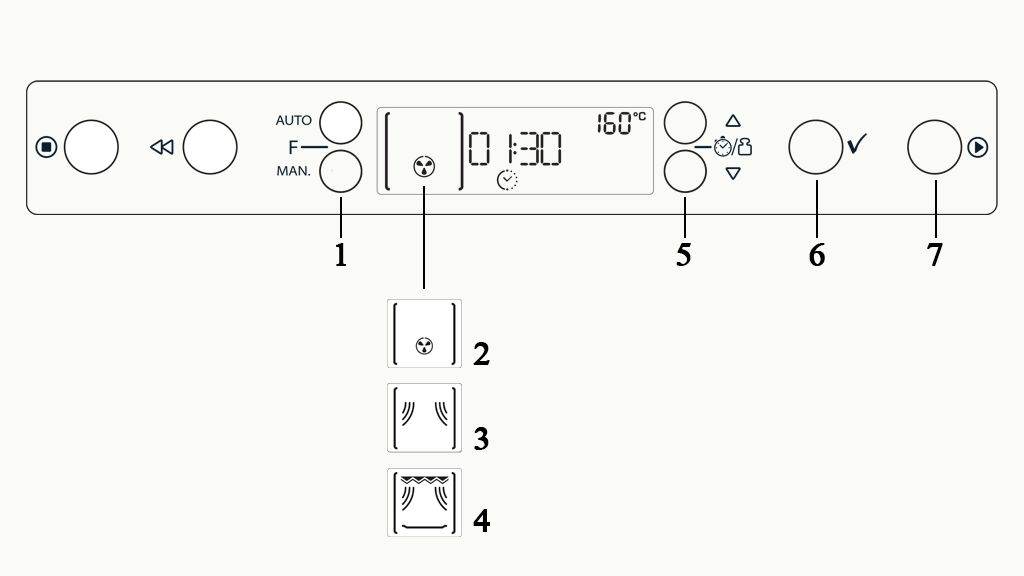
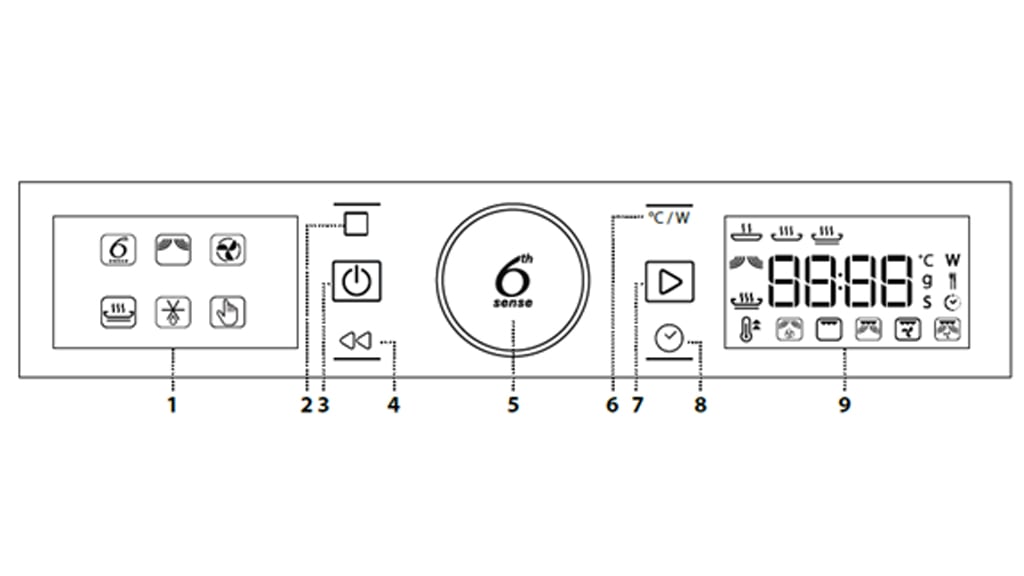
Type A
1. Press the function button several times (button 1) to select the desired oven setting or microwave function.
- Image 2: Convection oven. For heating bread rolls and oven dishes. Use the metal rack.
- Image 3: Microwave. For quickly heating food and beverages. Use the round glass plate.
- Image 4: Crisp. For cooking pizzas. Use the crisp plate and handle.
2. Select the desired oven temperature or microwave power by pressing the +/- (button 5).
3. Confirm your choice by pressing the tick (button 6).
4. Select the desired time by pressing +/- again.
5. Confirm your choice by pressing the tick again.
6. Press the start button (button 7).
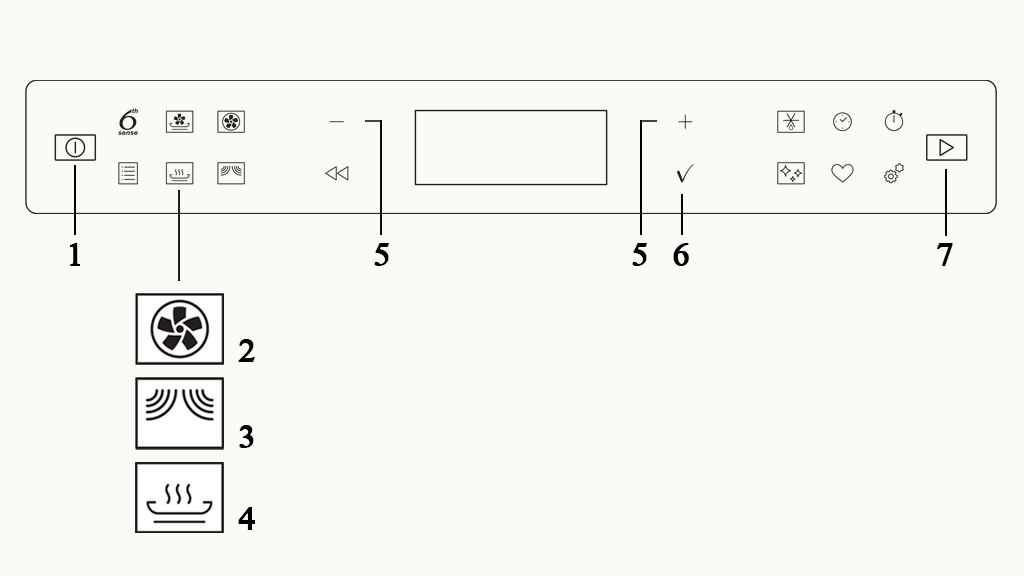
Type B
1. Press the power button (button 1) to turn on the oven.
2. Select the desired oven setting or microwave function by pressing one of the icons:
- Image 2: Turbo convection oven. For heating bread rolls and oven dishes. Use the metal rack.
- Image 3: Microwave. For quickly heating food and beverages. Use the round glass plate.
Note: not all accommodations have a combination microwave oven. These have a separate microwave.
- Image 4: Crisp. For cooking pizzas. Use the crisp plate and handle.
3. Select the desired oven temperature or microwave power by pressing +/- (button 5).
4. Confirm your choice by pressing the tick (button 6).
5. Select the desired time by pressing +/- again.
6. Confirm your choice by pressing the tick again.
7. Press the start button (button 7). When the microwave function is selected, the microwave will start automatically after the tick is pressed.
8. To switch the oven and combination microwave off, press the power button again (button 1).
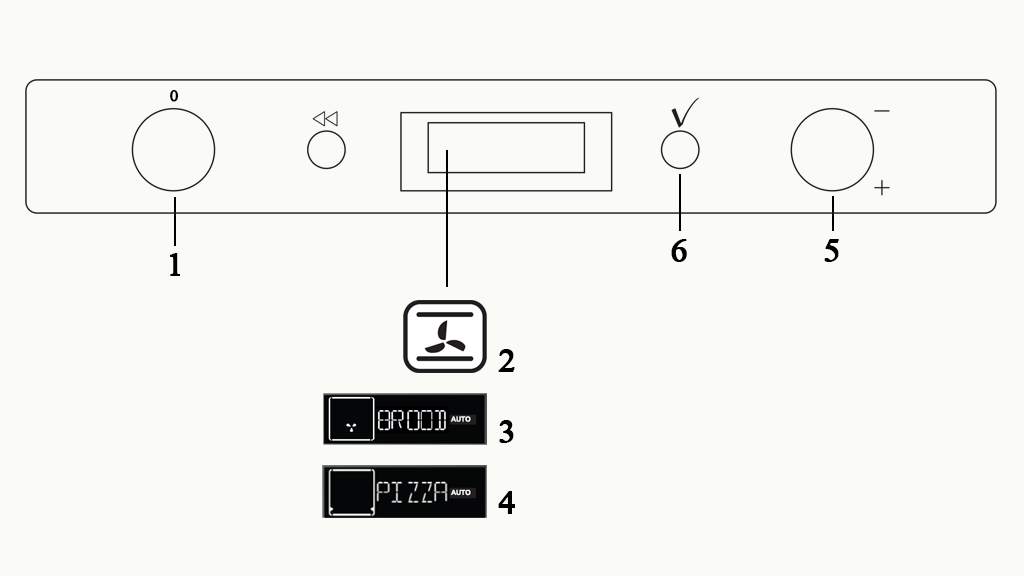
Type C
1. Select the desired oven setting by turning the function knob (knob 1). The display shows which function has been selected:
- Image 2: Turbo convection oven. For heating oven dishes. Use the metal rack.
- Image 3: Bread. For warming bread rolls. Use the metal rack.
- Image 4: Pizza. For cooking pizzas. Use the crisp plate and handle.
2. Select the desired oven temperature by turning the navigation knob (knob 5).
3. Confirm your choice by pressing the tick (button 6).
4. Select the desired time by turning the navigation knob again (knob 5).
5. Confirm your choice by pressing the tick again (button 6). The oven will start automatically.
6. To switch off the oven, turn the function knob (knob 1) back to 0.
Oven type D
1. Press the ON/OFF button (key 3) to switch on the combi oven.
2. Turn the knob to select the main function on the left display, then press the knob to confirm.
3. Turn the knob again to choose a sub-function on the right display. Press the knob to select.
4. When the symbol blinks, turn the knob to choose the desired category. Press the knob to confirm.
5. Press the start button (key 7) to begin the function.
6. To pause an active function, press the pause button (key 2). Press the start button (key 7) to resume.
7. A sound will signal when the program is complete. Then press the ON/OFF button (key 3) to turn off the combi oven.
Note:
- When the hot air function finishes, the appliance may run a cooling procedure. ‘Cool On’ will appear on the display.
- If you see ‘Door’ on the display, you may open and close the door and press the start button (key 7) to begin. This is a safety lock.
Sauna
There are two types of sauna in the accommodations at Efteling Bosrijk. See which of the user guides below applies to your accommodation.
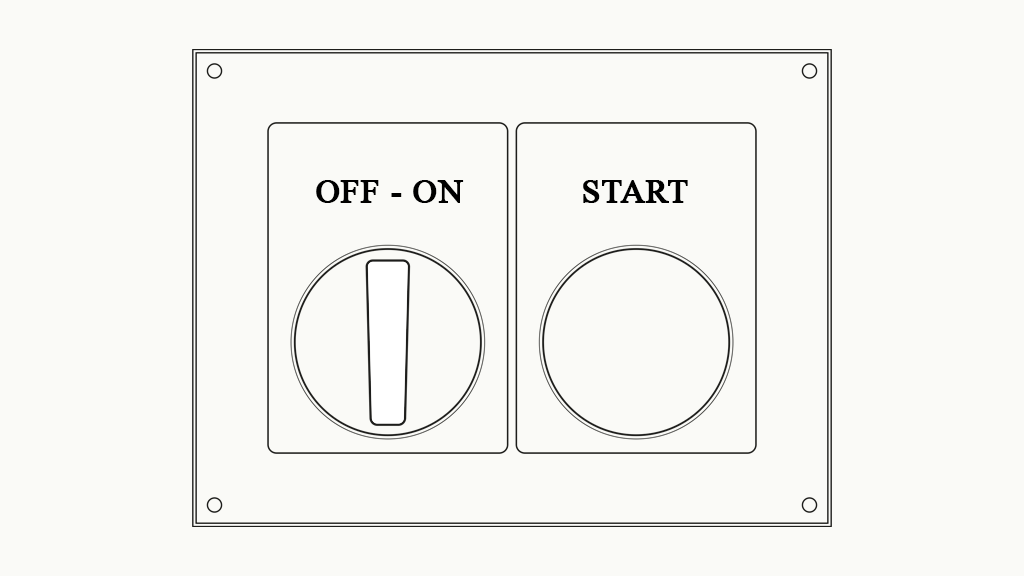
Type A
1. Take a hot shower and dry yourself well before using the sauna. Drink some water.
2. The key for the sauna is on the tray on the bar in the kitchen.
3. Turn the on/off switch to 'ON'. The lights in the cabin will now come on.
4. Press and hold the green start button until it lights up. The sauna will now heat up; this may take some time (± 1 hour).
5. Once the sauna has heated up, it is ready for use. Place a towel over the seat to sit on.
6. You can adjust the humidity in the sauna by pouring water over the stones. Note: please use a maximum of one scoop of water every five minutes to prevent the stones from cooling down too quickly. Exercise caution to prevent burns caused by steam or splashing water when pouring water over the stones.
7. You should spend a maximum of 15 minutes in the sauna.
8. After 15 minutes, leave the cabin. Take a cold shower and rest for about 15 minutes. You can then re-enter the sauna if you wish.
9. When you have finished using the sauna, turn the switch to 'OFF'.
10. Open the sauna door for a while to allow the cabin to cool down. Remember to close the door again once the cabin has cooled down.
11. Please return the key to the tray on the bar in the kitchen after using the sauna.
Note:
- The sauna heater gets very hot.
- Do not use the sauna if you have consumed alcohol or are taking strong medication.
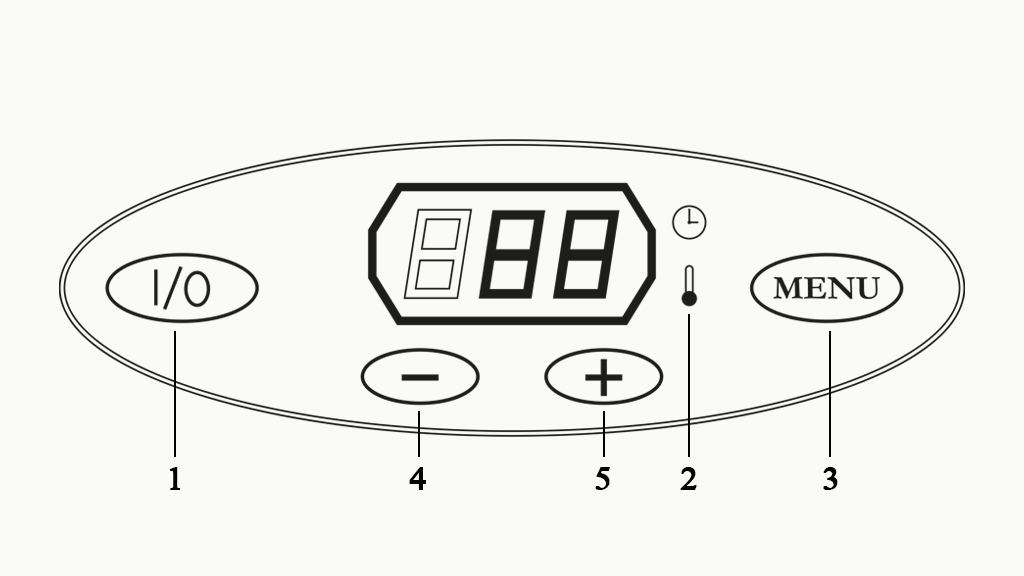
Type B
1. Take a hot shower and dry yourself well before using the sauna. Drink some water.
2. The key for the sauna is on the tray on the bar in the kitchen.
3. The heater can be started by pressing the 'I/0' button (button 1).
4. The temperature display (2) will light up.
5. The temperature will be displayed after five seconds.
- The temperature can be adjusted by pressing 'MENU' (button 3).
- Press '+/-' (buttons 4 and 5) to adjust the temperature.
- Then press 'MENU' again. You can now set how long you want the sauna to maintain this temperature by pressing '+/-' (buttons 4 and 5) again.
- Then press 'MENU' once to return to the main display.
6. Once the sauna has heated up, it is ready for use. Place a towel over the seat to sit on.
7. You can adjust the humidity in the sauna by pouring water on the stones. Note: please use a maximum of one scoop of water every five minutes to prevent the stones from cooling down too quickly. Exercise caution to prevent burns caused by steam or splashing water when pouring water over the stones.
8. You should spend a maximum of 15 minutes in the sauna.
9. After 15 minutes, leave the cabin. Take a cold shower and rest for about 15 minutes. You can then re-enter the sauna if you wish.
10. When you have finished using the sauna, press the 'I/0' button (button 1) again to turn the sauna off.
11. Open the sauna door for a while to allow the cabin to cool down. Remember to close the door again once the cabin has cooled down.
12. Please return the key to the tray on the bar in the kitchen after using the sauna.
Note:
- The sauna heater gets very hot.
- Do not use the sauna if you have consumed alcohol or are taking strong medication.
- To switch on the lights in the cabin, switch on the outdoor lights. The switch for the outdoor lights can be found next to the garden doors.
Thermostat
There are two types of thermostat in the accommodations at Efteling Bosrijk. See which of the user guides below applies to your accommodation.
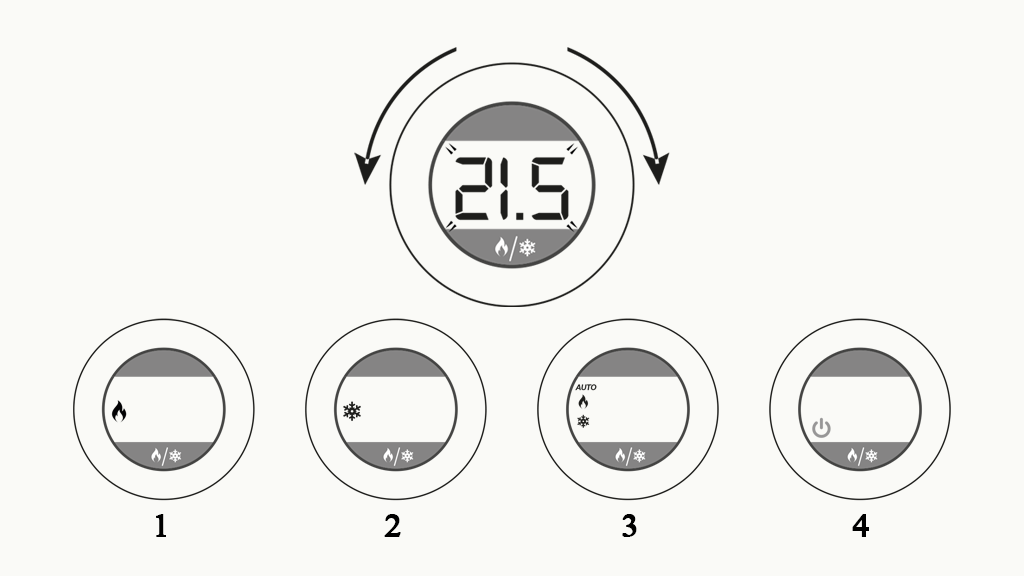
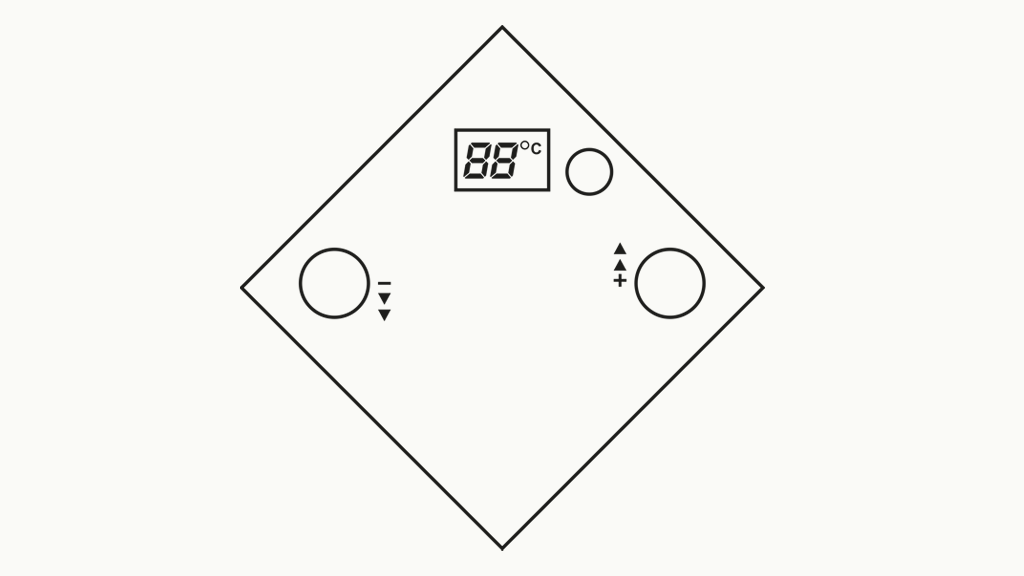
Type A:
1. Turn the control dial to the left (colder) or right (warmer) to adjust the temperature. When you let go of the dial, the thermostat will confirm the desired temperature by flashing a few times. The current temperature will then be displayed.
2. The button can be used to select other thermostat settings. Be careful not to set the thermostat to 'off':
- Image 1: Heating
- Image 2: Cooling
- Image 3: Automatic heating/cooling
- Image 4: Off
Useful information:
- If the outdoor temperature is very high, it may not be possible for the air conditioning to cool to the desired temperature.
- The accommodation has underfloor heating. This means that the accommodation is heated via radiated heat from the floor. It can take a while for the accommodation to reach the correct temperature.
- After prolonged use of hot water (shower or bath), the heat pump will heat the water first and then the floor. It may therefore take some time after showering or bathing for the accommodation to reach the correct temperature.
- An F70 notification on the thermostat means that the heat pump is now heating electrically. The thermostat can still be adjusted manually. After adjusting, the code F70 will reappear.
Type B:
1. The thermostat can be set to a minimum of 20 degrees and a maximum of 24 degrees.
2. To set the desired temperature, press the + and - buttons.
3. The thermostat will confirm the desired temperature by flashing a few times. The current temperature will then be displayed.
Useful information:
- If the outdoor temperature is very high, it may not be possible for the air conditioning to cool to the desired temperature.
- The accommodation has underfloor heating. This means that the accommodation is heated via radiated heat from the floor. It can take a while for the accommodation to reach the correct temperature.
- After prolonged use of hot water (shower or bath), the heat pump will heat the water first and then the floor. It may therefore take some time after showering or bathing for the accommodation to reach the correct temperature.
Extractor
There are two types of extraction system in the accommodations at Efteling Bosrijk. See which of the user guides below applies to your accommodation.
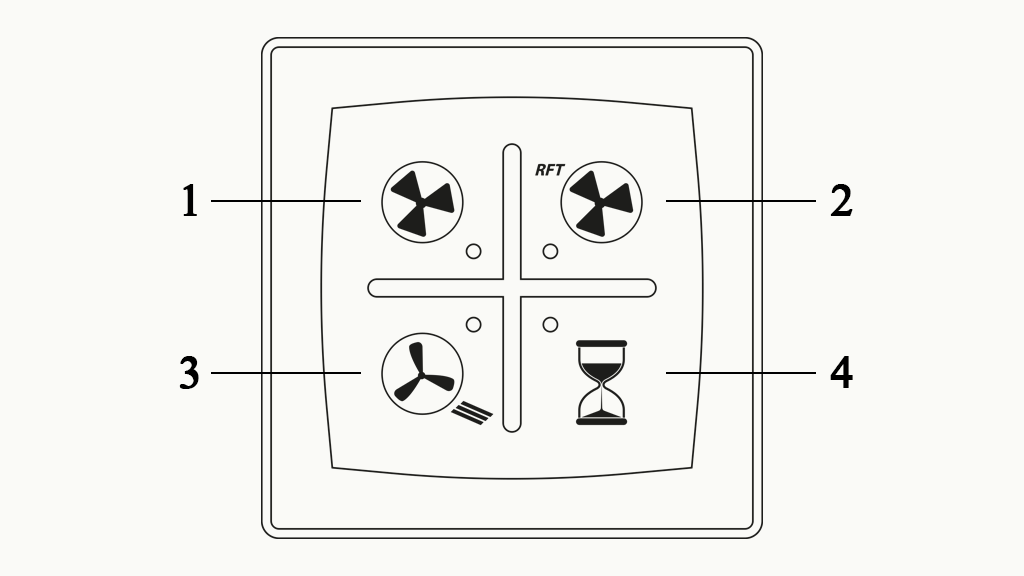
Type A:
- 1: Set extractor to lowest setting
- 2: Set extractor to highest setting
- 3: Set extractor to automatic setting
- 4: Set extractor on timer. After 15 minutes, the extractor will automatically return to the lowest setting.
Useful information: the extractor can only be set to the lowest setting and cannot be switched off.
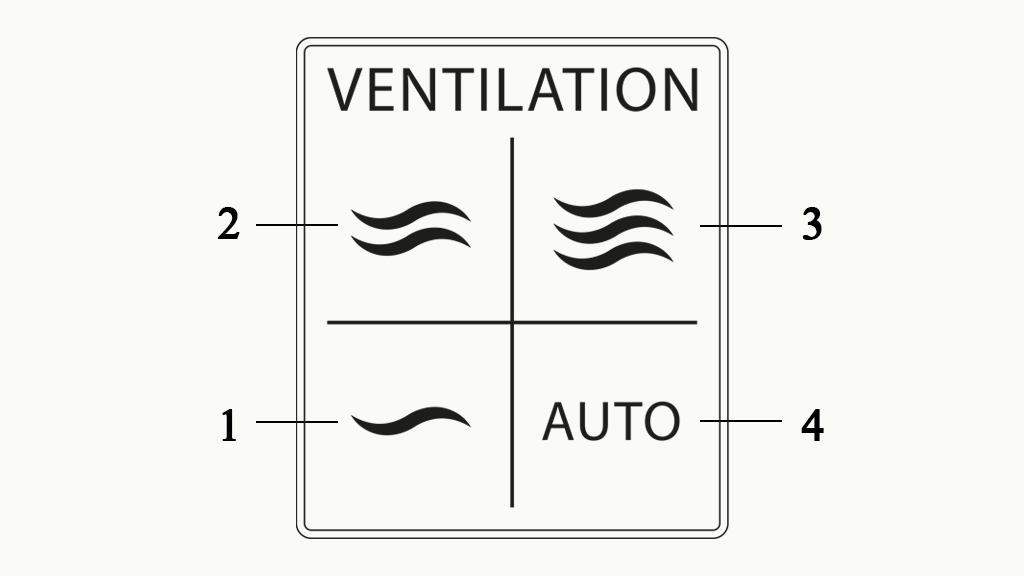
Type B:
- 1: Set extractor to lowest setting
- 2: Set extractor to medium setting
- 3: Set extractor to highest setting
- 4: Set extractor to automatic setting
Useful information: the extractor can only be set to the lowest setting and cannot be switched off.
Infrared cabin
1. Take a shower and dry yourself well before using the infrared cabin. Drink some water.
2. The infrared cabin has a single button for controlling everything in the cabin. Press this button once briefly. The infrared lamps will now turn on at medium strength.
3. Sit on a towel and let your body get used to the temperature.
4. To set the desired heat, press the button and hold it. The infrared lamps will now become stronger or dimmer.
5. Do not stay in the infrared cabin for more than 30 minutes in total. If you feel uncomfortable at any point, leave the cabin immediately.
6. To switch off the infrared cabin, briefly press the button again. The infrared lamps will switch off, and the regular lights in the cabin will come back on.
7. Press the button again briefly to switch off the infrared cabin. The regular lights will turn off automatically after three minutes. The infrared cabin will switch off automatically after 15 minutes.
8. Allow the cabin to air for a while after use by opening the door. Remember to close the door again once the cabin has cooled down.
9. Stay hydrated by drinking water or juice.
10. Allow the heat to continue working for at least 10 minutes (ensuring that you stay warm and do not get chilled), then take a lukewarm shower. For the best results, never take a cold shower immediately after using the infrared cabin.
Television
The television is in standby mode by default. To turn it on, press the power button on the remote control.
- Streaming is not available on this television
- Channel 1: Efteling Bosrijk information channel
- Channel 2: Efteling channel
- Channel 3: Fairytale channel
- Channel 15: Complete channel list